Networking & Content Delivery
CloudFront Functions Unified Logging
CloudFront Functions (CF2) lets you run lightweight code inside Amazon CloudFront Points-of-Presences (POPs) to analyze and manipulate viewer requests and responses at scale. Until now, gaining visibility into the decisions your functions made such as the result of a token validation or logging a header returned from origin required collecting the header from CloudFront Realtime Logging or logging the value to Amazon CloudWatch Logs (CWL) using a console.log(). Both options have tradeoffs. CloudFront Realtime Logging only provides 800 bytes of header information and only from viewer request. Outputting console.log() to CWL only provides context of the CloudFront Function, but not the full request requiring a custom pipeline to materialize this output with the CloudFront access log entry.
We’re excited to announce that you can now send custom data directly from CloudFront Functions into CloudFront access logs using two new log fields: viewer-request-log-data and viewer-response-log-data. These fields give you a simple, built-in way to enrich your CloudFront real-time and standard (v2) access logs with edge compute context and with no extra infrastructure or additional cost.
In this post, you’ll learn how these fields work, how to use them in your CloudFront Functions, and what the output looks like in your access logs.
How it works
Previously, to log the CF2 output with the full context of the request it required compute to read CloudFront access logs and CF2 logs and join them based on the x-edge-request-id value which is a unique ID assigned to every request:
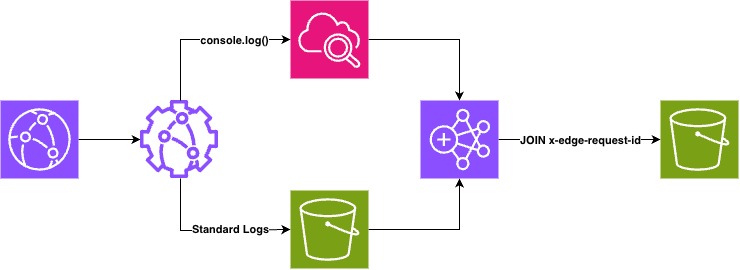
Figure 1: Join logs from CloudFront Function logs and CloudFront requests logs.
Now, a new helper function has been introduced that can be called either on viewer request or viewer response:
cf.logCustomData(String);
From within your function, you pass valid UTF-8 data to the helper function and then CloudFront writes the value inputted into the corresponding CloudFront log fields. Each field supports up to 800 bytes of data and is automatically truncated and URL encoded.

Figure 2: CloudFront Function log entries directly into CloudFront access logs.
Getting started
To start, you must first configure either the CloudFront standard (v2) logging or real-time logging to use the new fields. These fields can also be configured through AWS CloudFormation, CDK, or the AWS Console.
To enable these fields for standard (v2) logging from the AWS Console, navigate to your CloudFront distribution and select the Logging tab:

Figure 3: CloudFront logging tab.
Click Add and select a logging destination. On the next screen under Additional settings search for viewer-request-log-data and viewer-response-log-data. Finally, select the two new fields as seen below:
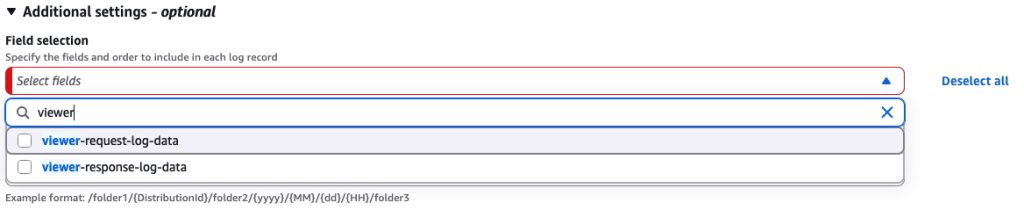
Figure 4: New viewer request and viewer response log fields.
Lastly, click the Submit button to save your logging configuration.
Examples
Example 1: Log token validation results from a viewer request function as a JSON object
Lets take an example of token authorizatoin at the edge to understand the usage of the new helper function. Your function validates a token on every request, and you want to log the outcome. You can now log additional information about why the token validation failed, whether that is an invalid signature, a malformed token, a missing token, or an expired token.
// Token authorization at the edge is a core use case for CloudFront Functions. The
// check runs in every edge location, on every request, in sub-millisecond time, and
// before CloudFront consults the cache.
//
// Functions are self-contained by design, which is what makes that performance
// possible. Token verification is therefore written directly against the runtime's
// built-in crypto module.
//
// This example stays focused on the logging feature, so verification covers the HS256
// signature and the exp/nbf time claims. A production function extends the same
// pattern with the checks its own tokens call for, such as iss, aud, and alg, and
// reads the signing key from CloudFront KeyValueStore rather than a constant.

import crypto from 'crypto';
import cf from 'cloudfront';

//Used for demonstration only, for production deployments use KVS to store signature key
const SIGNATURE_KEY = '<change me>';

const RESPONSE_401 = {
    statusCode: 401,
    statusDescription: 'Unauthorized',
    headers: { 'content-type': { value: 'application/json' } },
    body: JSON.stringify({ message: 'Unauthorized' })
};

const Reason = {
    VALID: 'VALID',
    MISSING: 'MISSING',
    MALFORMED: 'MALFORMED',
    SIGNATURE_INVALID: 'SIGNATURE_INVALID',
    EXPIRED: 'EXPIRED',
    NOT_YET_ACTIVE: 'NOT_YET_ACTIVE'
};

function _base64urlDecode(str) {
    return Buffer.from(str, 'base64url').toString('utf8');
}

// Constant-time compare to avoid signature timing side channels.
function _constantTimeEquals(a, b) {
    if (a.length !== b.length) {
        return false;
    }
    let xor = 0;
    for (let i = 0; i < a.length; i++) {
        xor |= a.charCodeAt(i) ^ b.charCodeAt(i);
    }
    return xor === 0;
}

function _sign(input, key) {
    // HS256: HMAC-SHA256, base64url-encoded.
    return crypto.createHmac('sha256', key).update(input).digest('base64url');
}

// Scoped to this example: signature first, then the exp/nbf time claims. See the note
// at the top of the file.
function verifyJwt(token, key) {
    // Is it well-formed (header.payload.signature)?
    const segments = token.split('.');
    if (segments.length !== 3) {
        return Reason.MALFORMED;
    }

    // Assign by index
    const headerSeg = segments[0];
    const payloadSeg = segments[1];
    const signatureSeg = segments[2];

    // Is the signature wrong on the token?
    const expectedSig = _sign(headerSeg + '.' + payloadSeg, key);
    if (!_constantTimeEquals(signatureSeg, expectedSig)) {
        return Reason.SIGNATURE_INVALID;
    }

    // Read the claims.
    let payload;
    try {
        payload = JSON.parse(_base64urlDecode(payloadSeg));
    } catch (e) {
        return Reason.MALFORMED;
    }

    // exp and nbf are in seconds per RFC 7519, so compare them against milliseconds.
    // Each must be a finite number: a non-numeric claim makes the comparison NaN,
    // which is always false and would let the token through.
    const now = Date.now();

    if (!Number.isFinite(payload.exp)) {
        return Reason.MALFORMED;
    }
    if (now > payload.exp * 1000) {
        return Reason.EXPIRED;
    }

    if (payload.nbf !== undefined) {
        if (!Number.isFinite(payload.nbf)) {
            return Reason.MALFORMED;
        }
        if (now < payload.nbf * 1000) {
            return Reason.NOT_YET_ACTIVE;
        }
    }

    return Reason.VALID;
}

function handler(event) {
    const request = event.request;

    // Is the token missing from the query string?
    if (!request.querystring.jwt) {
        cf.logCustomData(JSON.stringify({ logType: 'token', logValue: Reason.MISSING }));
        return RESPONSE_401;
    }

    const reason = verifyJwt(request.querystring.jwt.value, SIGNATURE_KEY);

    cf.logCustomData(JSON.stringify({ logType: 'token', logValue: reason }));

    if (reason !== Reason.VALID) {
        return RESPONSE_401;
    }

    // Valid: strip the token before forwarding to origin.
    delete request.querystring.jwt;
    return request;
}
Take a moment to notice the cf.logCustomData helper function in the handler. Here we can see the output of the token analysis being logged to provide the operator with more details about each CloudFront request, not just a simple valid or invalid.
Here are the snippet outputs of the viewer-request-log-data field we logged from the CloudFront access logs in JSON format.{"viewer-request-log-data":"%7B%22logType%22:%22token%22,%22logValue%22:%22VALID%22%7D","viewer-response-log-data":"-"}{"viewer-request-log-data":"%7B%22logType%22:%22token%22,%22logValue%22:%22MISSING%22%7D","viewer-response-log-data":"-"}{"viewer-request-log-data":"%7B%22logType%22:%22token%22,%22logValue%22:%22SIGNATURE_INVALID%22%7D","viewer-response-log-data":"-"}
Example 2: Log a header from the origin in the viewer response function as plaintext
In this example, we’ll log a header from the origin, then delete it so it never reaches the viewer.
import cf from 'cloudfront';

function handler(event) {
    var response = event.response;
    var request = event.request;

    // Check if the debug header exists, if so log it
    if (response.headers['x-origin-debug-header']) {
        // Log the origin debug header value
        cf.logCustomData('debug header found: ' + response.headers['x-origin-debug-header'].value);
        delete response.headers['x-origin-debug-header'];
    }

    return response;
}
Here are the snippet outputs of the viewer-response-log-data field we logged from the CloudFront access logs in w3c format.#Fields: viewer-response-log-datadebug%20header%20found:%20origin-server-iad-02debug%20header%20found:%20origin-server-iad-04debug%20header%20found:%20origin-server-iad-01
Conclusion
The helper function “cf.logCustomData” gives you a straightforward way to log custom context from your CloudFront Functions into your CloudFront access logs. Whether you’re tracking token validation outcomes, origin routing decisions, A/B test assignments, or any other per-request metadata, you can now capture it without building separate logging infrastructure.
To get started, add the new log fields to your real-time log configuration or standard logging (v2) setup, and start calling cf.logCustomData() in your CloudFront Functions. Log in to the CloudFront console and try it out today.
About the authors

Joe Viggiano
Joe Viggiano is a Principal Solutions Architect helping media and entertainment companies accelerate their adoptions of cloud-based solutions.

Carl Johnson
Carl Johnson is a Principal Solutions Architect.